How to setup simple multi-auth for SAML and OAuth2 using Rails and Devise

When building web applications, a common requirement is to implement an authentication system. In the vast universe of web development, there are numerous ways to authenticate users; however, two of the most widely used technologies are OAuth2 and SAML. In the Ruby on Rails ecosystem, the Devise gem is the most popular solution for all things authentication, providing a highly flexible and powerful tool for developers' needs. This article focuses on setting up a simple but robust multi-authentication system using OAuth2 and SAML with Rails and Devise. From understanding the core concepts of each technology to overcoming various hurdles in the configuration and setup process, we'll cover everything you need to smoothly integrate these critical systems into your Rails application.
What is OAuth2?
OAuth2, which stands for Open Authorization version 2, is a protocol that allows a user's account information to be used by third-party services, such as Facebook, without revealing the user's password. OAuth2 provides authorized access to user data while protecting the user's credentials. It is often used as a way for users to log in to other trusted services such as Google, Facebook, or GitHub.
OAuth2 primarily provides a process for end-users to authorize third-party access to their server resources without sharing their credentials (typically a username and password pair). It allows certain data to be shared with an application while keeping the user's credentials private.
It's important to note that OAuth2 is not a secure way to authenticate a user, but rather a standard authorization protocol. It can be used in conjunction with technologies such as OpenID Connect to achieve authentication.
What is SAML?
SAML, which stands for Security Assertion Markup Language, is an open standard protocol for handling authentication and authorization between an Identity Provider (IdP) and a Service Provider (SP).
SAML is an XML-based standard for communicating authentication credentials between two parties. In a SAML flow, the Identity Provider (IdP) provides the Service Provider (SP) with a signed XML document containing a variety of identity assertion information that validates and authenticates a user.
SAML is most commonly used in enterprise business tools, primarily for single sign-on (SSO) scenarios. This one-click user experience improves productivity because users don't have to remember multiple username/password combinations and aren't interrupted by multiple login prompts when moving between enterprise applications.
With SAML authentication, the identity provider performs the authentication process and sends the SAML assertion document to the service provider. However, the service provider parses the SAML assertion document, verifies it by checking the identity provider's digital signature, extracts the user profiles and attributes, and then authorizes the user based on those attributes.
What is Identity Provider (IdP) and Service Provider in SAML?
The identity provider is a service that provides the account information. The service provider is your application.
How to set up a sample OAuth2 app via Google?
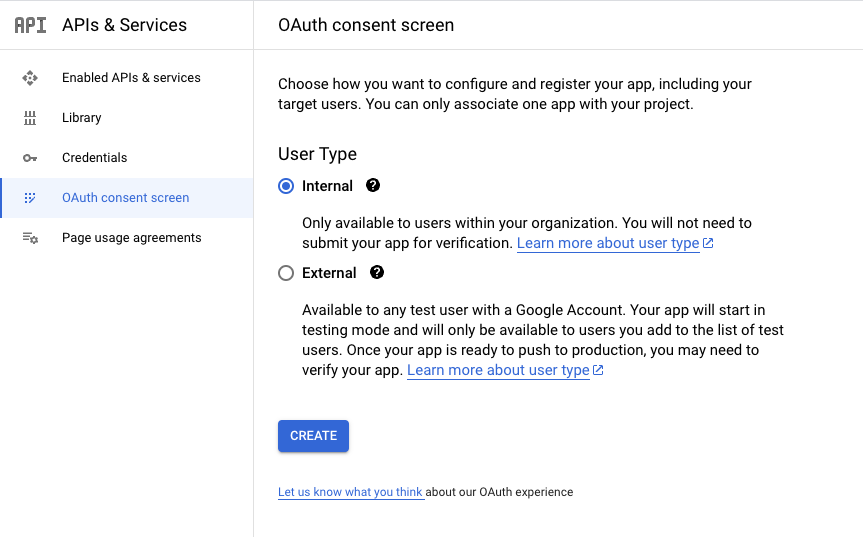
First, make sure you're signed in to your Google Account. Create a new project in the Google Cloud Resource Manager (https://console.cloud.google.com/cloud-resource-manager). Navigate to the 'OAuth consent screen' section. Select either 'Internal' or 'External', then select 'Create'.
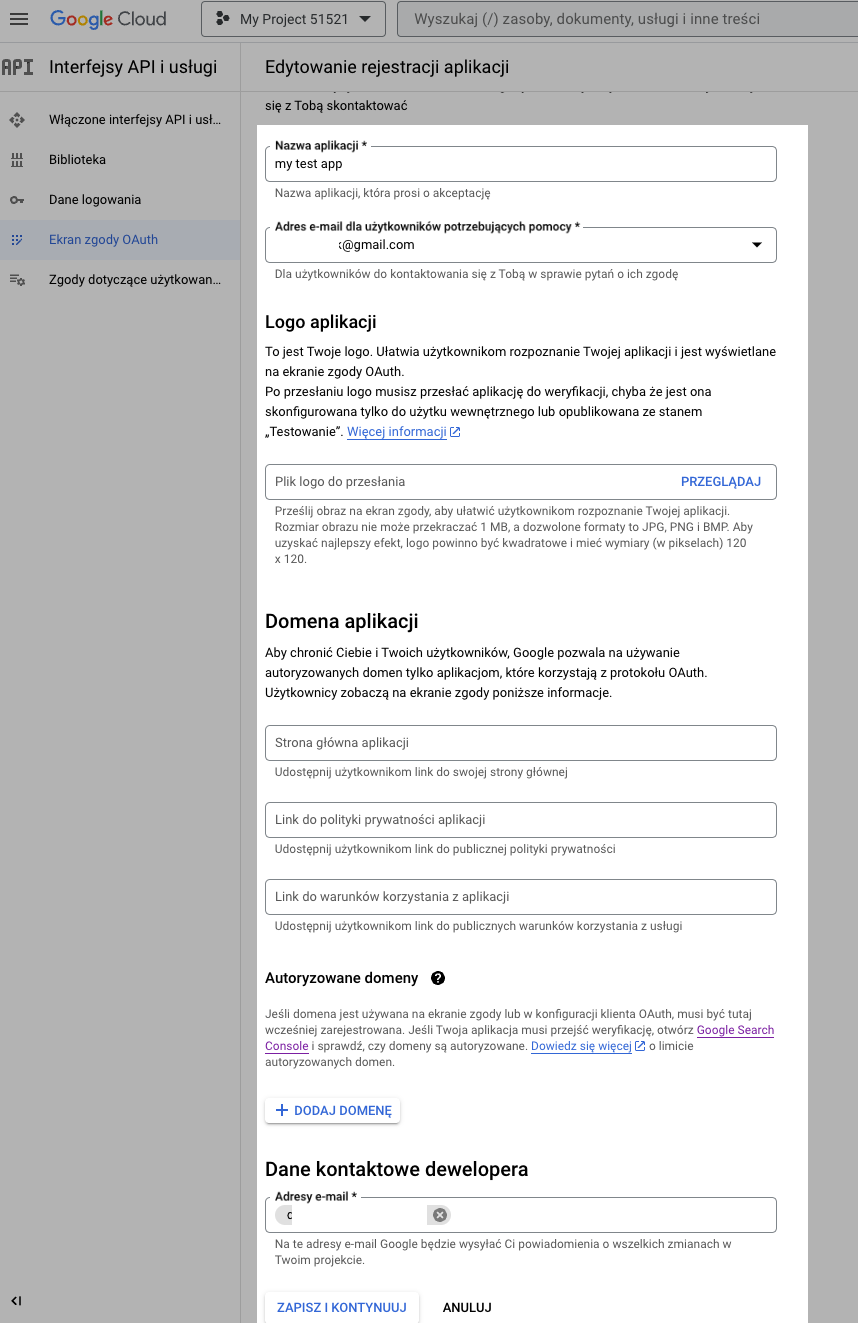
Fill in the information on the next screen. This includes the name of the application and your email address. This email will be the primary contact for the developers. After filling in the details, click "Save and Continue".
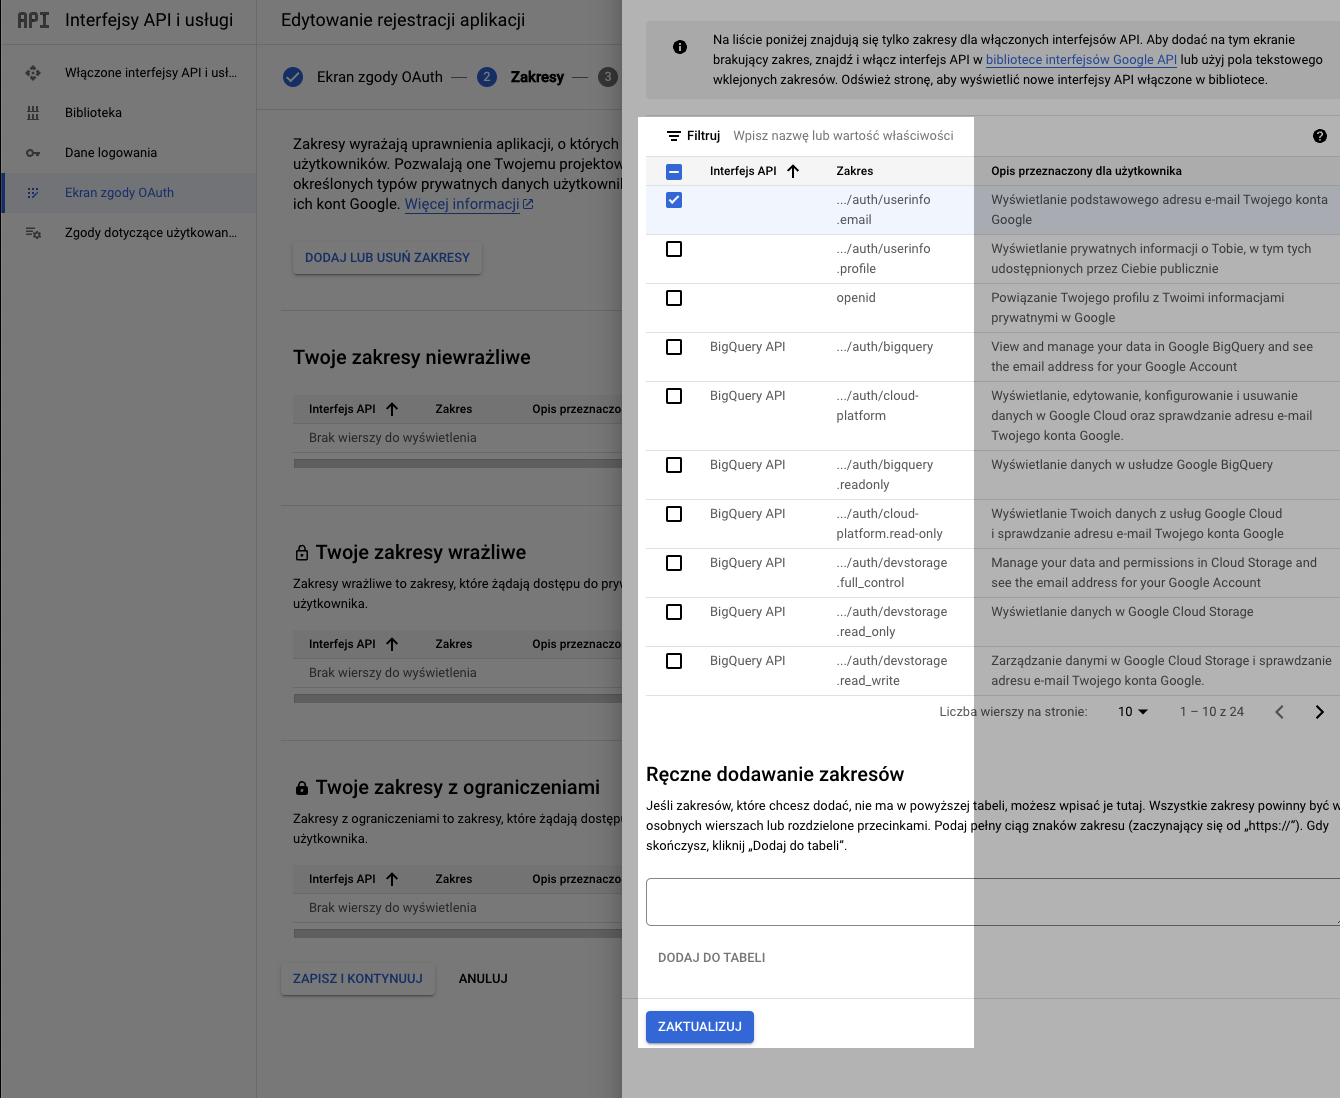
On the next screen, click 'Add Resources'. Then select auth/userinfo.email for our minimal setup. Then click 'Update'.
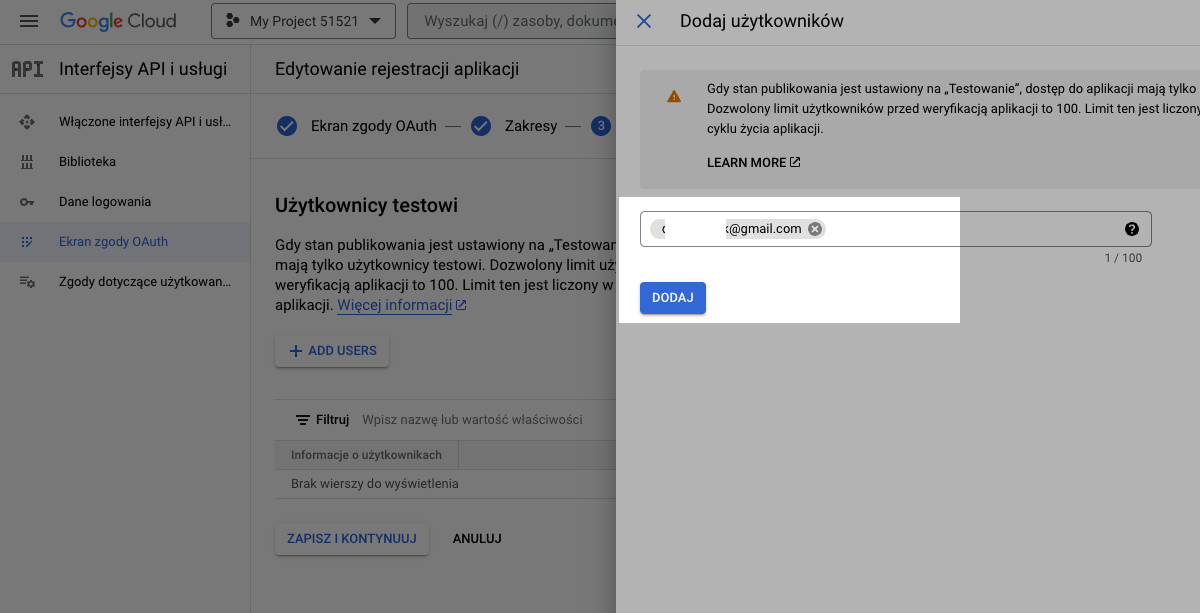
To add users who can log in to your app, use your Google email account for now.
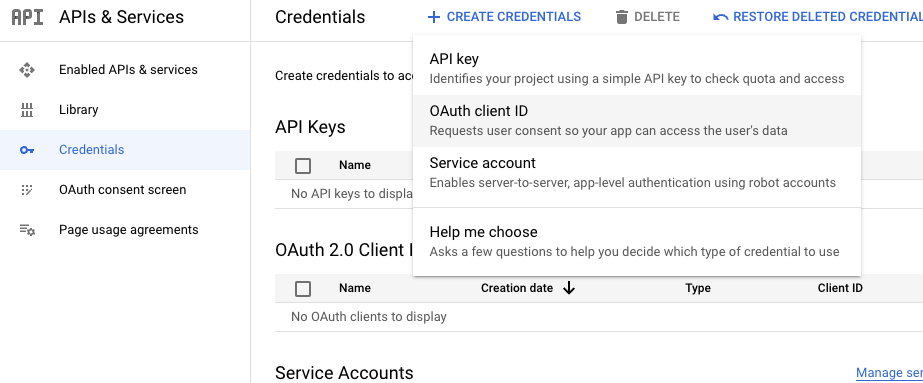
Go to the Credentials section at Google Cloud Credentials (https://console.cloud.google.com/apis/credentials) and click 'Create Credentials'. Then, select 'Create OAuth client ID'.
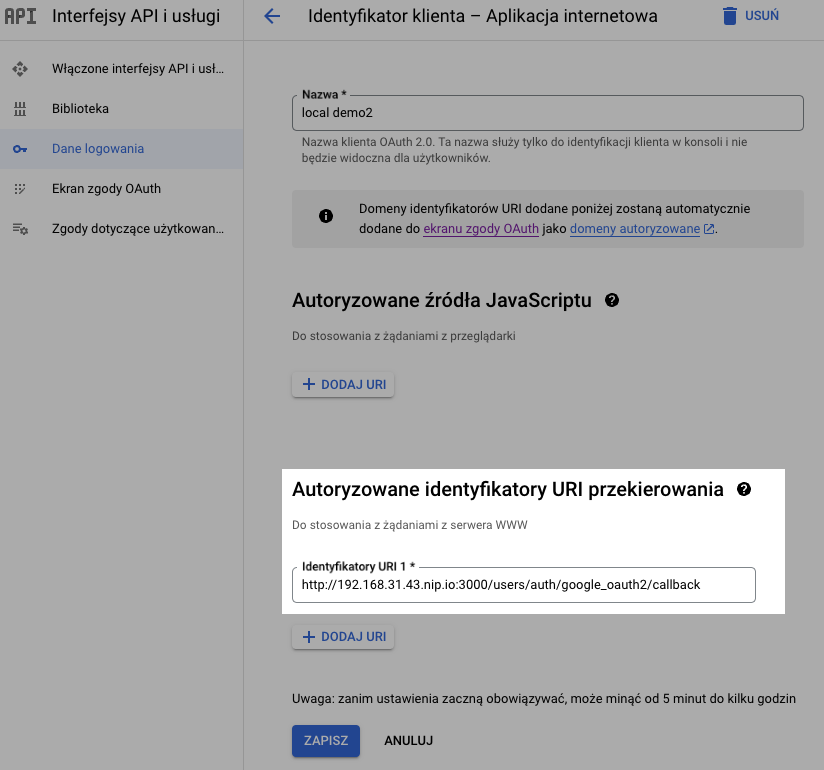
Create a name and add the Authorized URL in the edit section: http://your-app-domain.com:3000/users/auth/google_oauth2/callback
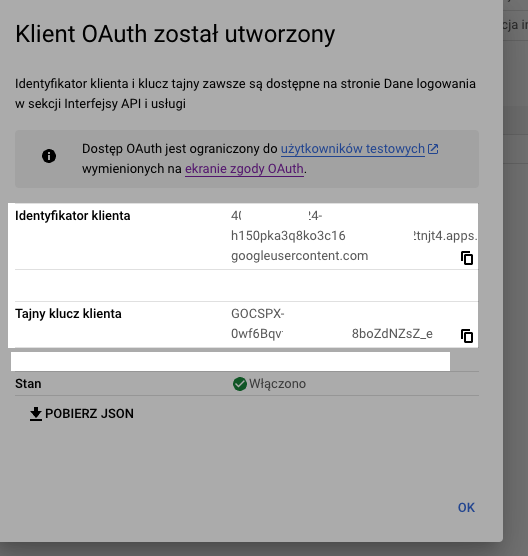
Click 'Save' and you will be given a client ID and a client secret. Both are required for integration with your Rails application.
How to set up a sample SAML app via OneLogin?
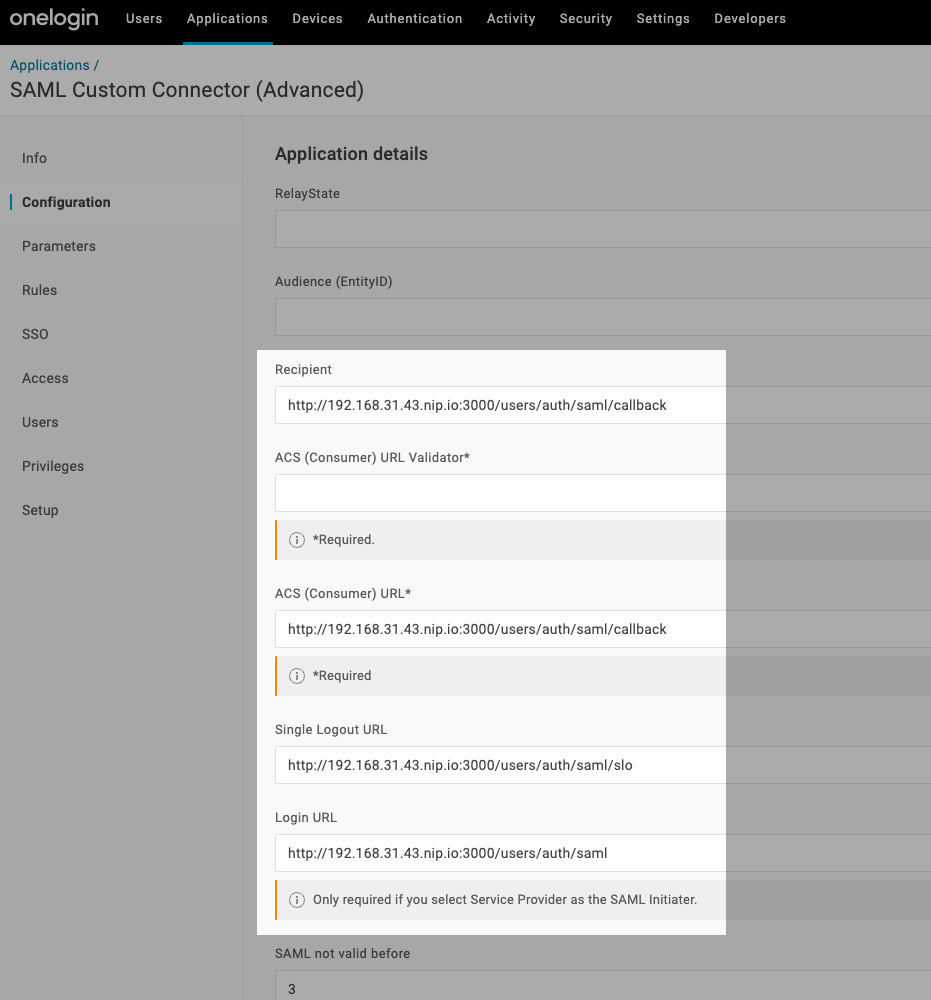
Sign up for an account with OneLogin. Navigate to Applications and locate 'SAML Custom Connector'. Click on the connector and give it a unique name. Once created, go to the Configuration tab and fill in the required fields.

The URL should match your application's domain. For example, if you're using a local machine, enter something like http://192.168.31.43.nip.io:3000. The rest of the URL will probably stay the same as on the image unless you change the device configuration routing.
Next, you'll need specific values from your identity provider, which can be obtained from the XML provided. Be sure to copy and save the link; it will be needed to set details such as idp_slo_service_url, idp_cert, idp_sso_service_url, etc.
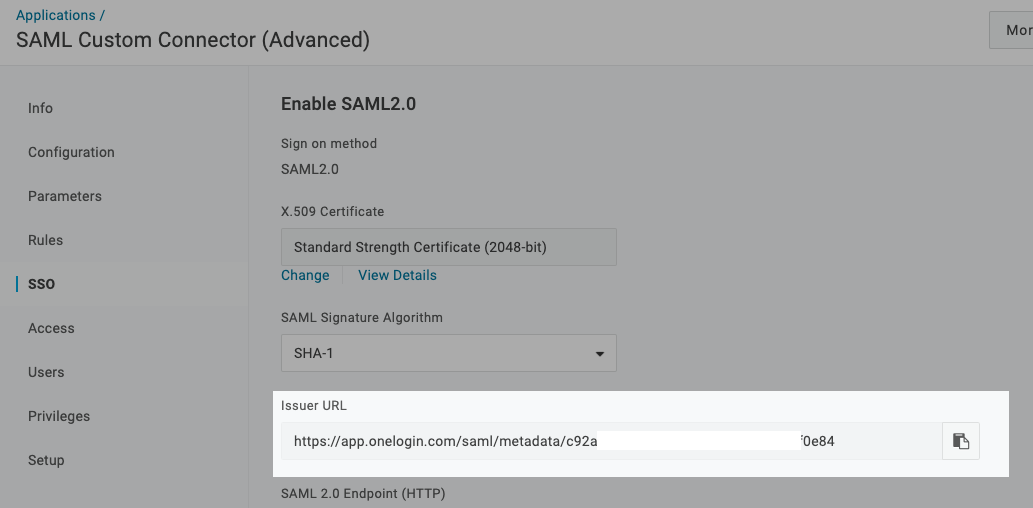
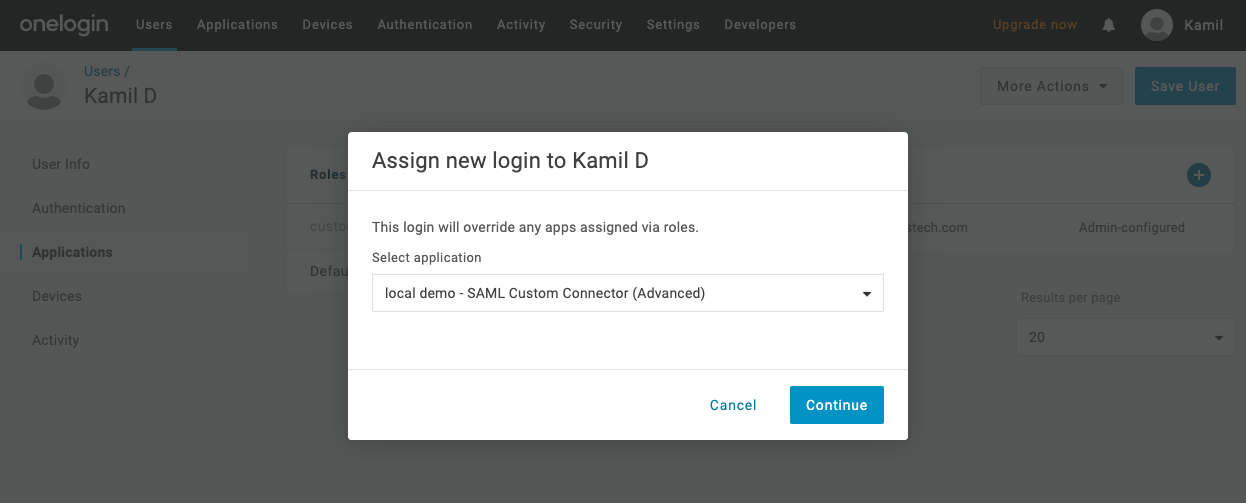
Finally, go to your profile section and assign access to your newly created application. This will allow your account to log in. To assign access, navigate to Users, select your user, go to the Applications tab on the left, and click the "+" icon at the top right. Then select your application and click "Next".
How to set up a sample SAML app via Okta?
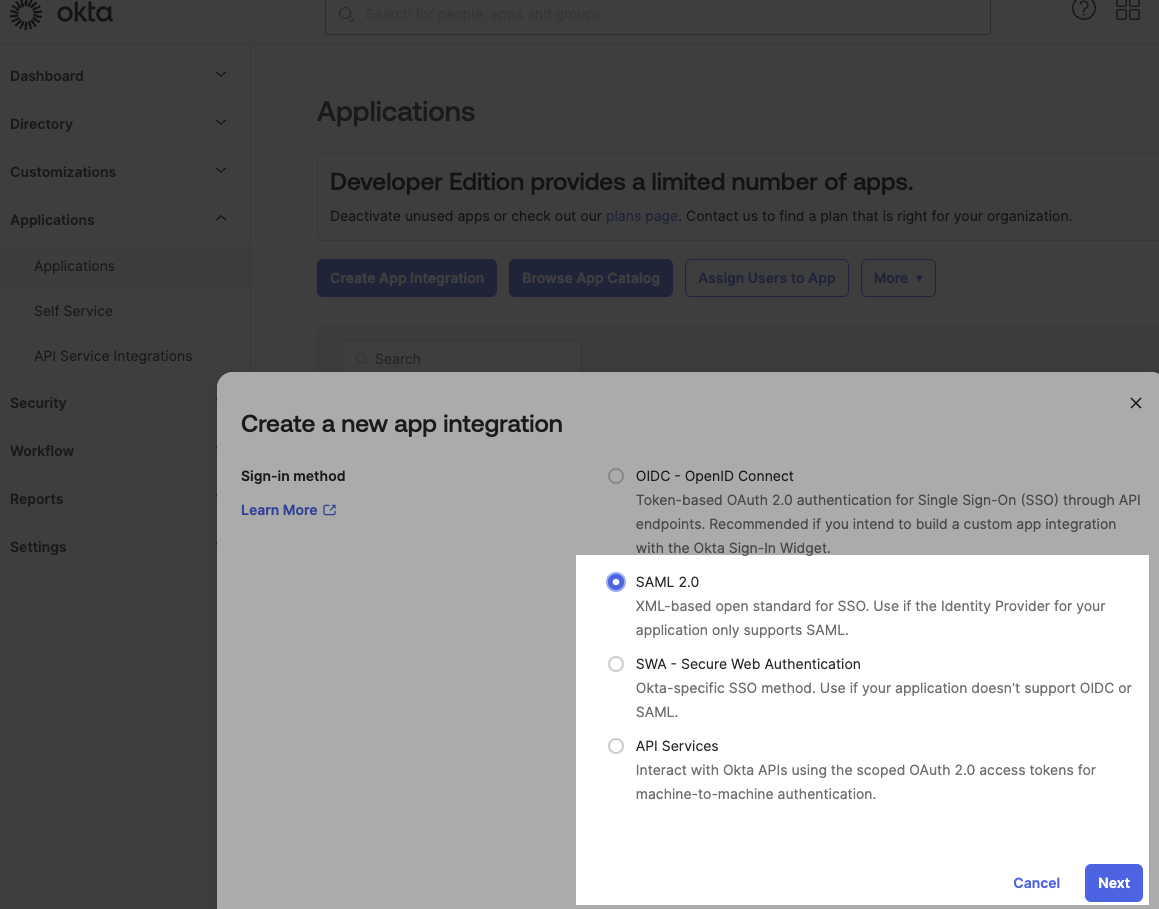
After creating your account, navigate to the admin/apps/active subpage and click on 'Create App Integration'. Select 'SAML 2.0' and continue.
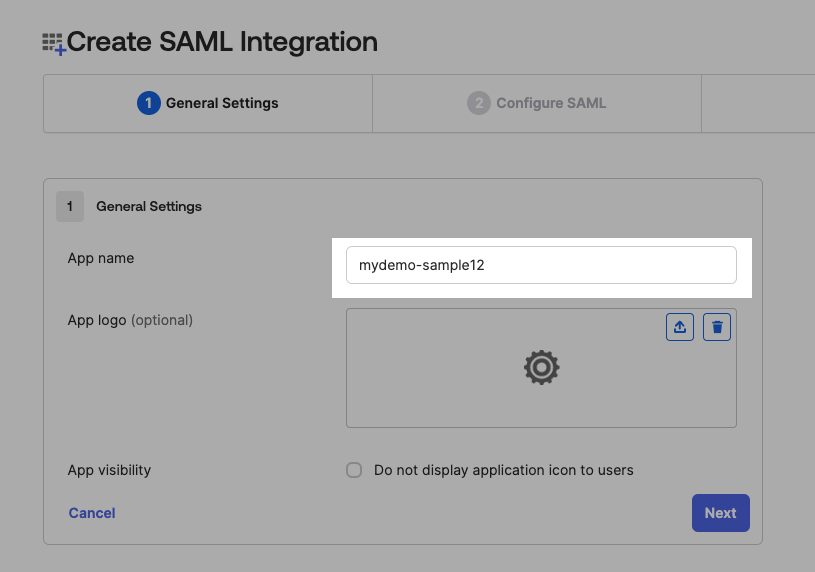
Enter a unique name for your application in the App Name field and proceed to the next step.
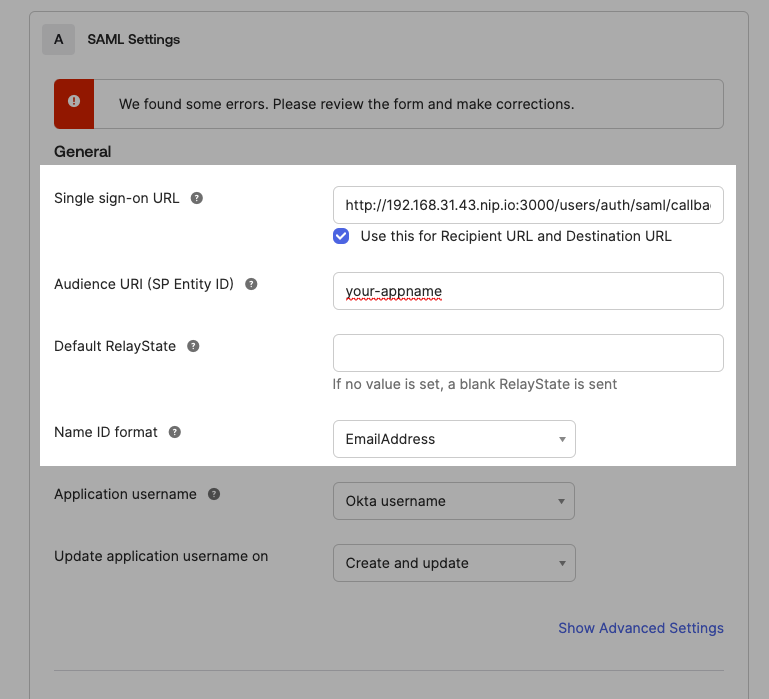
Next, enter your single sign-on URL. This could be something like http://your-sample-domain.nip.io:3000/users/auth/saml/callback. Make sure you check the 'Use this for the recipient URL and destination URL' box. The recipient URI is the identifier for your application, you can enter anything that allows you to easily identify it. Also, make sure that the 'Name ID format' is set to EmailAddress.
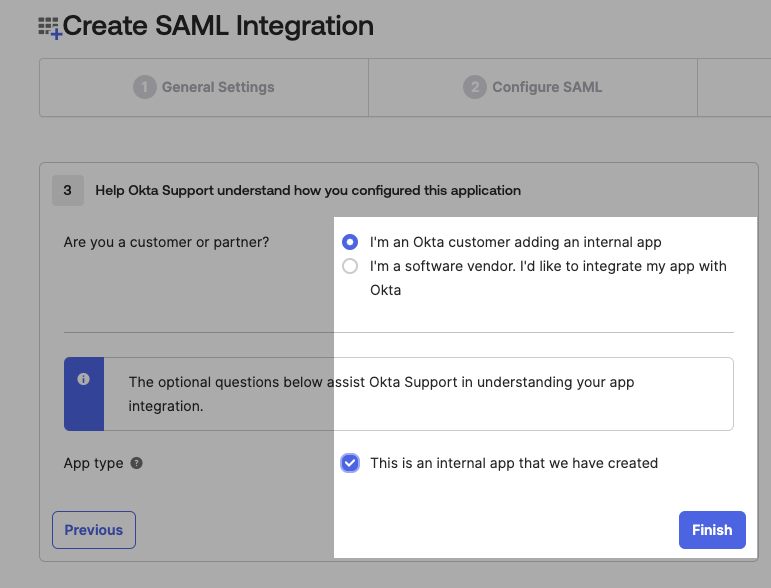
Click 'Next' and select 'I'm an Okta customer adding an internal app' and 'This is an internal app that we have created'. Then, click 'Finish'.
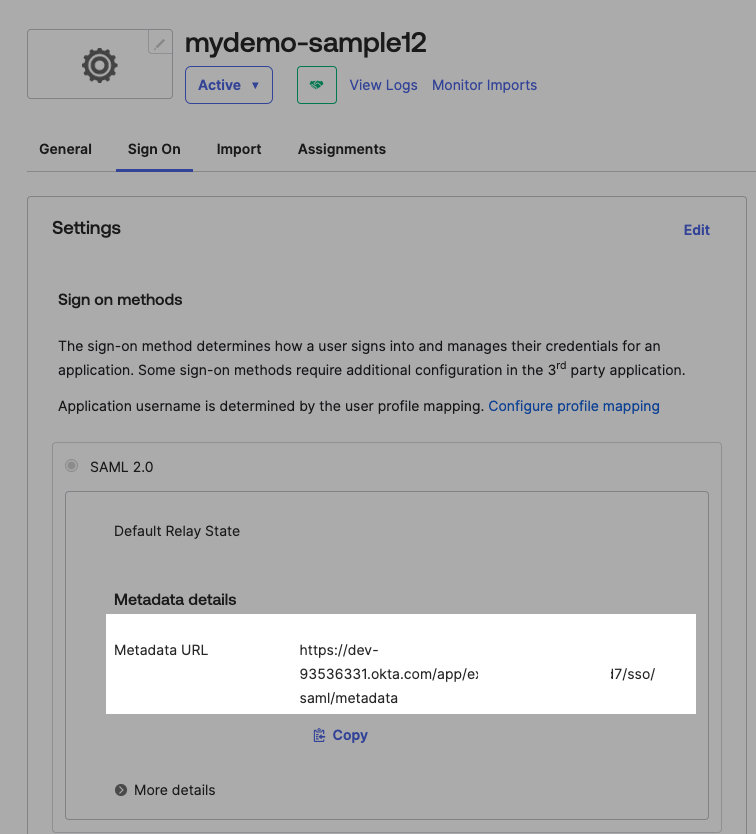
Congratulations on your success! You now have a critical component - the MetadataURL. It gives you access to the information you need to configure your Rails application later. Make sure you save this link somewhere safe.
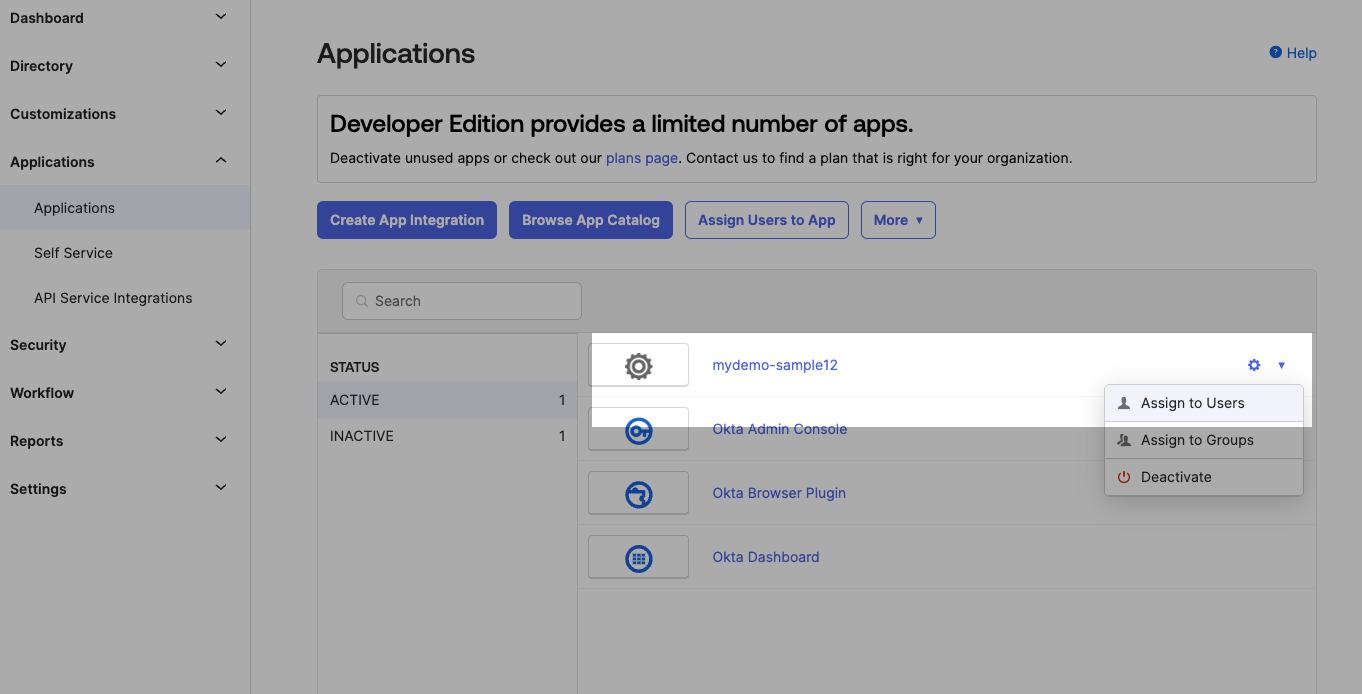
Go back to the list of applications, click the gear icon, and select "Assign to Users. Then select the user who will have access to this app. This will allow you to use the credentials from your primary Okta account in your Rails app later.
Integrating Google multi-auth in Rails with Devise
Assuming you already have a Ruby on Rails application and Devise installed, the next step is to integrate some gems to support Omniauth.
gem 'omniauth-google-oauth2', '1.1.1'
gem 'omniauth-rails_csrf_protection', '1.0.1'
Then run bundle install. Now update your Devise routes in your routes.rb file.
# routes.rb
  devise_for :users,
             controllers: {
               omniauth_callbacks: 'users/omniauth_callbacks',
             }
After setting up the routes, add a OmniauthCallbacksController.
# app/controllers/users/omniauth_callbacks_controller.rb
class Users::OmniauthCallbacksController < Devise::OmniauthCallbacksController
  skip_before_action :verify_authenticity_token

  def google_oauth2
    user = User.find_by(email: google_oauth_email)
    if user.present?
      sign_in_and_redirect_user(user, 'Google')
    else
      flash[:alert] = t('devise.omniauth_callbacks.failure', kind: 'Google', reason: "#{google_oauth_email} is not authorized.")
      redirect_to after_omniauth_failure_path_for
    end
  end

  private

  def google_oauth_email
    request.env['omniauth.auth']&.info&.email
  end

  protected

  def after_omniauth_failure_path_for(_scope_resource = nil)
    root_path
  end

  def after_sign_in_path_for(_scope_resource = nil)
    root_path
  end
end
The controller will process the information returned by Google and try to retrieve a user by email. If a user is found, it will redirect to the root_path. If not, it will display an error and redirect to the login page. All the information returned can be accessed via request.env['omniauth.auth'].
Now, let's make sure Devise knows that we want to use Omniauth for Google. Update your user model accordingly.
# app/models/user.rb
class User < ApplicationRecord
  devise :database_authenticatable, :registerable,
         :recoverable, :rememberable, :validatable,
         # add omniauthable
         :omniauthable, omniauth_providers: %i[google_oauth2]
end
Indicate to Devise that the user model is :omniauthable. We also need to pass the previously saved client_id and client_secret. To accomplish this, create a new file named devise_multi_auth.rb in config/initializers/.
# config/initializers/devise_multi_auth.rb
class BaseMultiAuthSetup
  def self.call(env)
    new(env).setup
  end

  def initialize(env)
    @env = env
  end

  def setup
    @env['omniauth.strategy'].options.merge!(omniauth_strategy_settings)
  end
end

class GoogleOauth2Setup < BaseMultiAuthSetup
  def omniauth_strategy_settings
    # You can add your own logic here, e.g. set options based on URL/params/etc.
    # request.params['saml_idp'] == 'idp1' ? idp1_settings : idp2_settings
    # request.subdomain == 'myprojectname1' ? { client_id: '1', client_secret: '2' } : { client_id: '3', client_secret: '4' }
    #
    # You can find this data in your Google API Console at https://console.cloud.google.com/apis/credentials.
    {
      client_id: '400905005724-h150pkaaaanjt4.apps.googleusercontent.com',
      client_secret: 'GOCSPX-0wfbbbbbbbbbbb8boZdNZsZ_e'
    }
  end
end

Devise.setup do |config|
  config.omniauth :google_oauth2, setup: GoogleOauth2Setup
end
This file gives you complete control over what data is routed under GoogleOauth2Setup#omniauth_strategy_settings. You can simply add a hash object with the required data. Alternatively, you can add custom logic based on parameters. See the comments for examples.
As an additional step, let's add a login button. Make sure the button has turbo:false to avoid CORS issues. To do this, we will create a session.html.erb file.
<!-- views/devise/sessions/new.html.erb -->
<h2>Log in</h2>

<form method="post" action="<%= user_google_oauth2_omniauth_authorize_path %>" data-turbo="false">
  <input type="hidden" name="authenticity_token" value=<%= form_authenticity_token %>>
  <button type="submit">Login via Google OAuth2</button>
</form>

<%= form_for(resource, as: resource_name, url: session_path(resource_name)) do |f| %>
  <div class="field">
    <%= f.label :email %><br />
    <%= f.email_field :email, autofocus: true, autocomplete: "email" %>
  </div>

  <div class="field">
    <%= f.label :password %><br />
    <%= f.password_field :password, autocomplete: "current-password" %>
  </div>

  <% if devise_mapping.rememberable? %>
    <div class="field">
      <%= f.check_box :remember_me %>
      <%= f.label :remember_me %>
    </div>
  <% end %>

  <div class="actions">
    <%= f.submit "Log in" %>
  </div>
<% end %>

<%= render "devise/shared/links" %>
Update your devise/shared/links.html.erb file to prevent path-related errors.
<!-- views/devise/shared/links.html.erb -->

<%- if controller_name != 'sessions' %>
  <%= link_to "Log in", new_session_path(resource_name) %><br />
<% end %>

<%- if devise_mapping.registerable? && controller_name != 'registrations' %>
  <%= link_to "Sign up", new_registration_path(resource_name) %><br />
<% end %>

<%- if devise_mapping.recoverable? && controller_name != 'passwords' && controller_name != 'registrations' %>
  <%= link_to "Forgot your password?", new_password_path(resource_name) %><br />
<% end %>

<%- if devise_mapping.confirmable? && controller_name != 'confirmations' %>
  <%= link_to "Didn't receive confirmation instructions?", new_confirmation_path(resource_name) %><br />
<% end %>

<%- if devise_mapping.lockable? && resource_class.unlock_strategy_enabled?(:email) && controller_name != 'unlocks' %>
  <%= link_to "Didn't receive unlock instructions?", new_unlock_path(resource_name) %><br />
<% end %>
That's all it takes for successful authentication via a Google account! Run rails s and navigate to the login page to sign in using Google.
How to solve domain problems under development stage?
You'll notice in the screenshots that I'm using a .nip.io domain, which acts as a proxy for my local development environment. If you prefer, you can just use http://localhost:3000. However, if you want to use a domain that supports subdomains and other features for your local machine, you can learn how to do that by reading this article.
Integrating SAML multi-auth in Rails with Devise
Start by adding a new gem to your Gemfile.
gem 'devise', '4.9.3'
gem 'omniauth-google-oauth2', '1.1.1'
gem 'omniauth-saml', '2.1.0' #gem that support SAML protocol
gem 'omniauth-rails_csrf_protection', '1.0.1'
Execute bundle install. Next, navigate to the recently created callbacks controller and add a new method for SAML:
# app/controllers/users/omniauth_callbacks_controller.rb
class Users::OmniauthCallbacksController < Devise::OmniauthCallbacksController
  skip_before_action :verify_authenticity_token

  def google_oauth2
    # ...
  end

  def saml
    user = User.find_by(email: saml_data_response.uid)

    # create user if not exists
    # you can add additional check based on the group name/etc. (saml_data_response_group_name) passed by IdProvider
    if user.nil?
      user = User.create!(
        email: saml_data_response.uid,
        password: SecureRandom.hex(16),
        # role_group: saml_data_response_group_name,
        # first_name: saml_data_response.info.first_name,
        # last_name: saml_data_response.info.last_name
      )
    end

    sign_out_all_scopes
    flash[:success] = t('devise.omniauth_callbacks.success', kind: 'SAML')
    sign_in_and_redirect user, event: :authentication
  end

  private

  def google_oauth_email
    request.env['omniauth.auth']&.info&.email
  end

  def saml_data_response
    request.env['omniauth.auth']
  end

  def saml_data_response_group_name
    # you can fetch any specified attribute from your IdP
    saml_data_response.extra.response_object.attributes['group']
  end

  protected

  def after_omniauth_failure_path_for(_scope_resource = nil)
    root_path
  end

  def after_sign_in_path_for(_scope_resource = nil)
    root_path
  end
end
This newly added saml method will capture all the data passed by our identity provider. First, it tries to find a user using the saml_data_response.uid passed. If a user is found, the user will be redirected to root_path. If the user is not found, a new user is created based on the data provided by the identity provider.
Now let's notify Devise that you're integrating SAML support. Visit your user.rb model to do so:
# app/models/user.rb
class User < ApplicationRecord
  devise :database_authenticatable, :registerable,
         :recoverable, :rememberable, :validatable,
         :omniauthable, omniauth_providers: %i[google_oauth2 saml] # support google_oauth2 and saml
end
Luckily, we won't need to update routes.rb because the necessary routing for Omniauth was added during the Google auth setup. Next add a configuration file to provide the necessary SAML configuration details:
# config/initializers/multi_auth_devise.rb
class BaseMultiAuthSetup
  def self.call(env)
    new(env).setup
  end

  def initialize(env)
    @env = env
  end

  def setup
    @env['omniauth.strategy'].options.merge!(omniauth_strategy_settings)
  end

  def omniauth_strategy_settings
    raise NotImplementedError
  end
end

class SamlMultiAuthSetup < BaseMultiAuthSetup
  def omniauth_strategy_settings
    # You can add your own logic here, e.g. set options based on URL/params/etc.
    # request.params['saml_idp'] == 'idp1' ? idp1_settings : idp2_settings
    # request.subdomain == 'myprojectname1' ? { aa: 1 } : { aa: 2 }

    {
      # You can find this data in your IdProvider's metadata XML file. You can retrieve these missing details using that code:
      # your_issuer_url_xml = 'https://app.onelogin.com/saml/metadata/21bf2959-9dbb-49f1-8f8f-4e246bc0cfd8'
      # data = OneLogin::RubySaml::IdpMetadataParser.new.parse_remote(your_issuer_url_xml)
      # data.idp_sso_service_url
      #
      # Each field is described in detail here: https://github.com/omniauth/omniauth-saml#options
      # idp_slo_service_url: 'https://myappnamedemo-dev.onelogin.com/trust/saml2/http-redirect/slo/2687489', # This field is not required, but it is nice to support it.
      idp_cert_fingerprint: '17:FE:F0:46:65:43:15:69:5F:A5:C0:00:56:6A:50:45:83:B4:63:54', # SHA1 fingerprint of the IdP signing certificate
      idp_sso_service_url: "https://dev-93536331.okta.com/app/dev-93536331_mydemosample12_1/exkceus6zpxWJI2I75d7/sso/saml",

      # This data is configured by you (here, in this file).
      sp_entity_id: 'your-appname',
      allowed_clock_drift: 5,
      slo_default_relay_state: "/users/sign_in",
      request_attributes: [:name, :first_name, :last_name, :email],
      name_identifier_format: 'urn:oasis:names:tc:SAML:1.1:nameid-format:emailAddress',
      single_logout_service_url: "http://192.168.1.45.nip.io:3000/users/auth/saml/slo",
      assertion_consumer_service_url: 'http://192.168.1.45.nip.io:3000/users/auth/saml/callback',
      # skip_recipient_check: true, # specified recipient URL(same as assertion_consumer_service_url) in your IdProvider | default: false
    }
  end
end

class GoogleOauth2Setup < BaseMultiAuthSetup
  def omniauth_strategy_settings
   # ...
  end
end

Devise.setup do |config|
  config.omniauth :saml, setup: SamlMultiAuthSetup
  #config.omniauth :google_oauth2, setup: GoogleOauth2Setup
end
Under SamlMultiAuthSetup#omniauth_strategy_settings, you need to specify any missing credentials. If you saved the Issue URL from OneLogin or the Metadata URL from Okta, now is the time to add these details. You can do this using the Rails console.
your_issuer_url_xml = 'https://app.onelogin.com/saml/metadata/11bf2959-9dbb-49f1-8f8f-33333'
data = OneLogin::RubySaml::IdpMetadataParser.new.parse_remote(your_issuer_url_xml)
data.idp_sso_service_url #=> "https:/...."
data.idp_cert_fingerprint #=> "AA:BB.."
Use the console to update the missing credentials. Make sure the URL domains are updated correctly. Now add a button to your login form:
<!-- views/devise/sessions/new.html.erb -->
<h2>Log in</h2>

<form method="post" action="<%= user_google_oauth2_omniauth_authorize_path %>" data-turbo="false">
  <input type="hidden" name="authenticity_token" value=<%= form_authenticity_token %>>
  <button type="submit">Login via Google OAuth2</button>
</form>
<br>
<form method="post" action="<%= user_saml_omniauth_authorize_path %>" data-turbo="false">
  <input type="hidden" name="authenticity_token" value=<%= form_authenticity_token %>>
  <button type="submit">Login via SAML</button>
</form>

<%= form_for(resource, as: resource_name, url: session_path(resource_name)) do |f| %>
  <div class="field">
    <%= f.label :email %><br />
    <%= f.email_field :email, autofocus: true, autocomplete: "email" %>
  </div>

  <div class="field">
    <%= f.label :password %><br />
    <%= f.password_field :password, autocomplete: "current-password" %>
  </div>

  <% if devise_mapping.rememberable? %>
    <div class="field">
      <%= f.check_box :remember_me %>
      <%= f.label :remember_me %>
    </div>
  <% end %>

  <div class="actions">
    <%= f.submit "Log in" %>
  </div>
<% end %>

<%= render "devise/shared/links" %>
To support logging out of the Identity Provider, update the destroy action for the Devise SessionsController. Here's a sample implementation:
# controllers/users/sessions_controller.rb
class Users::SessionsController < Devise::SessionsController
  def destroy
    # save the saml_uid and saml_session_index in the session when destroying directly from SAML IdProvider
    saml_uid = session['saml_uid']
    saml_session_index = session['saml_session_index']

    super do
      session['saml_uid'] = saml_uid
      session['saml_session_index'] = saml_session_index
    end
  end

  protected

  def after_sign_out_path_for(_resource_or_scope)
    if session['saml_uid'] && session['saml_session_index'] # && saml_config.idp_slo_service_url.present? # make sure 'idp_slo_service_url' is configured!
      user_saml_omniauth_authorize_path + '/spslo'
    else
      new_user_session_path
    end
  end
end
When a user logs out, the system stores the user's SAML unique identifier (saml_uid) and SAML session index (saml_session_index) from the session before executing the destroy method of the parent class.
The after_sign_out_path_for method determines the post-logout redirect for the user. If the destroy method preserved SAML information in the session and the Identity Provider (IdP) is configured to handle the Single Logout (SLO) service, the user is redirected to perform a SAML logout. Otherwise, the user is redirected to the login form.
In essence, this code allows for integrated logout processes where logging out from your application also logs the user out from the SAML identity provider.
How to solve CORS problems when logging/out via OAuth and SAML?
To troubleshoot CORS issues with OAuth or SAML login/logout, consider whether your application uses Turbo. If it does, make sure to disable Turbo for the form. You can do this by adding data-turbo="false" or data: { turbo: false } to your form configuration. This change will prevent Turbo from processing your form, thus avoiding potential CORS-related problems.
<!-- login page -->
<form method="post" action="<%= user_google_oauth2_omniauth_authorize_path %>" data-turbo="false">
  <input type="hidden" name="authenticity_token" value=<%= form_authenticity_token %>>
  <button type="submit">Login via Google OAuth2</button>
</form>
<br>
<form method="post" action="<%= user_saml_omniauth_authorize_path %>" data-turbo="false">
  <input type="hidden" name="authenticity_token" value=<%= form_authenticity_token %>>
  <button type="submit">Login via SAML</button>
</form>
Summary
I hope this article helps you get started with OAuth2 and SAML authentication. For a complete Rails implementation example, you can check out this repository. You might want to check out the commits to see how the setup was done.
Repository with example implementation: https://github.com/Oxyconit/multiauthappdevise
Happy coding!