Painting 'Lady with a weasel' using genetic algorithms and Ractor parallelism in Ruby

At the intersection of creativity and computation lies a fascinating field known as generative art. This is the process of creating art using non-human systems such as computer algorithms. In this article, we'll take an in-depth look at genetic algorithms (GA) and ractor parallelism in Ruby, using the recreation of the famous painting "Lady with a Weasel" as a case study.
Genetic Algorithms: An Overview
Genetic algorithms (GAs) are inspired by the theory of natural selection. They are search-based algorithms used to find exact or approximate solutions to optimization and search problems. They operate through three primary mechanisms: Selection (a stage that simulates "survival of the fittest"), Crossover (mating individuals to produce offspring), and Mutation (introducing minor changes into an offspring).
The script in Ruby to paint 'Lady with a Weasel'

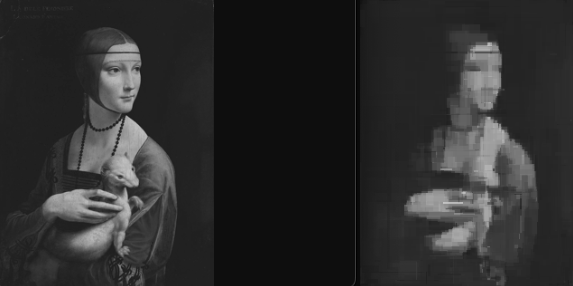
The process starts by using the ChunkyPNG library to load original_image.png, which is the image we want to recreate. Our goal is to generate random images through genetic mutation until we get an image that resembles the original.
require 'chunky_png'
image = ChunkyPNG::Image.from_file('original_image.png')
Next, we will define some constants related to image measures and how our genetic algorithm will work. We will also need to create some arrays to store our generation results.
IMAGE_WIDTH = image.width # width of image
IMAGE_HEIGHT = image.height # height of image
IMAGE_SIZE = IMAGE_WIDTH * IMAGE_HEIGHT # size of image
SPECIMEN_COUNT = 350 # number of specimens per generation
BEST_SPECIMEN_COUNT = 2 # number of best specimens moved to next generation
DUMP_TO_IMG_EVERY = 10 # dump best to image every n-th generation

original_image = Array.new(IMAGE_HEIGHT) { Array.new(IMAGE_WIDTH) }
specimen = Array.new(SPECIMEN_COUNT) { Array.new(IMAGE_SIZE, 0) } # 2D array of specimens
best_spec = Array.new(BEST_SPECIMEN_COUNT) { Array.new(IMAGE_SIZE, 0) } # 2D array of best specimens
best_specimens = Array.new(BEST_SPECIMEN_COUNT) # array of indexes of best specimens
step = 0
We also create empty 2D arrays to hold our original grayscale image data, our specimens, and arrays for our best specimens with their indexes. Next, we need to convert them from RGB to grayscale.
# convert image to 2D array of grayscale values (not color!, only grayscale)
IMAGE_WIDTH.times do |x|
  IMAGE_HEIGHT.times do |y|
    r = ChunkyPNG::Color.r(image[x, y])
    g = ChunkyPNG::Color.g(image[x, y])
    b = ChunkyPNG::Color.b(image[x, y])
    original_image[y][x] = (r + g + b) / 3 # sum all rgb and divide by 3
  end
end
The reason we use grayscale images is to reduce complexity. Since we're focusing on shape rather than colour, grayscale is sufficient.
Genetic algorithm lifecycle
Let's look at the loop through the lifecycle of a genetic algorithm: mutation, evaluation, crossing and dumping an image file to visually inspect the progress of every nth generation.
loop do
  mutate(specimen) # draw a rectangle randomly on the image with random color
  score_all(specimen, original_image, best_specimens) # score all specimens and select BEST_SPECIMEN_COUNT best specimens
  cross_specimens(specimen, best_spec, best_specimens) # cross best specimens with other specimens
  dump_best_to_img(step, specimen, best_specimens) # dump best to image
  step += 1
  puts "generation number: #{step}"
end
Below we will describe exactly what each step does. But for now, this is the basic start of how the loop(generation) should work.
Mutation
In the GA lifecycle, the mutation function plays an important role, where small changes are applied to the proposed solutions or samples. In the given scenario, we mutate the image by randomly drawing rectangles of random colours at random positions. This is done using the mutate method:
def mutate(specimen)
  # generate random rectangles on the image
  SPECIMEN_COUNT.times do |i|
    x = rand(IMAGE_WIDTH - 1)
    y = rand(IMAGE_HEIGHT - 1)
    w = rand(IMAGE_WIDTH - x - 1) + 1
    h = rand(IMAGE_HEIGHT - y - 1) + 1
    color = rand(256)

    # that code will draw a rectangle randomly on the image with random color
    (y...y + h).each do |n|
      (x...x + w).each { |m| specimen[i][n * IMAGE_WIDTH + m] = (specimen[i][n * IMAGE_WIDTH + m] + color) / 2 }
    end
  end
end
Fitness Scoring
GA's scoring function calculates how close each sample is to the original image. Each pixel of the grayscale image obtained from the "sample" is compared to the corresponding pixel in the original image, with the goal of minimizing the score.
def score_specimen(selected_specimen, original_img)
  # score is sum of squared differences between original image and selected specimen
  score = 0.0
  IMAGE_HEIGHT.times do |j|
    IMAGE_WIDTH.times do |i|
      a = selected_specimen[j * IMAGE_WIDTH + i]
      b = original_img[j][i]
      score += (a - b) ** 2 # accumulate squared difference(diff between specimen image and original image)
    end
  end
  score
end
We're using a squared difference algorithm to score the effect of a specimen.
Scoring all generated specimens
We can calculate the effect of one specimen, so now we need to calculate that for all one generation. To speed up the process, we use Ractor, a parallel execution feature in Ruby 3.0, to run the scoring function on different cores of our CPU.
def score_all(specimen, original_img, best)
  # that code will score all specimens and select BEST_SPECIMEN_COUNT best specimens
  scores = []

  # create array of Ractors for each specimen(3.25x performance boost)
  SPECIMEN_COUNT.times do |i|
    scores << Ractor.new(i, specimen[i], original_img) do |idx, spec, orig_img|
      { score: score_specimen(spec, orig_img), idx: idx }
    end
  end

  # get result from each Ractor and sort them
  scores.map!(&:take).sort_by! { |score_data| score_data[:score] }

  BEST_SPECIMEN_COUNT.times { |i| best[i] = scores[i][:idx] }
end
Crossover
The crossover method is used to combine the "genes" of parent specimens to produce offspring for the next generation. In our image reconstruction script, we take a simplified approach to crossover. We select the best from the current generation (based on their score) and carry them over to the next generation:
def cross_specimens(specimen, best_spec, best)
  # that code will cross best specimens with other generated specimens
  BEST_SPECIMEN_COUNT.times do |i|
    best_spec[i] = specimen[best[i]].dup
  end
  (BEST_SPECIMEN_COUNT...SPECIMEN_COUNT).each do |i|
    specimen[i] = best_spec[i % BEST_SPECIMEN_COUNT].dup
  end
end
Where best_spec is the array of the best specimen from the previous generation and specimen is the array of all specimens. The function duplicates the best specimens and overwrites the worst specimens. In this way, the "genes" or grayscale values of the best specimens are passed on to the next generation.
Show me the result!
The last step is to dump the image into file. But it's just a simple translation from a 2D array to file every nth generation.
def dump_best_to_img(step, specimen, best)
  return if step % DUMP_TO_IMG_EVERY != 0 # dump every xx generation

  time_from_start = (Time.now - @start_time).to_i
  puts "dumping best to image, working #{time_from_start} seconds from start"

  img_array = specimen[best[0]].each_slice(IMAGE_WIDTH).to_a
  img = ChunkyPNG::Image.new(IMAGE_WIDTH, IMAGE_HEIGHT, ChunkyPNG::Color::TRANSPARENT)

  IMAGE_WIDTH.times do |x|
    IMAGE_HEIGHT.times do |y|
      val = img_array[y][x].round
      img[x, y] = ChunkyPNG::Color.rgb(val, val, val)
    end
  end

  img.save("gen_#{step}_spec_#{SPECIMEN_COUNT}_bestSpecimen_#{BEST_SPECIMEN_COUNT}_after_#{time_from_start}_sec.png", interlace: true)
end
Conclusion
Using ingenious methods like genetic algorithms and Ractor parallelism, we create beautiful works of art in a truly scientific way. The concepts and code discussed on the blog offer an exciting perspective for developers interested in exploring the intersection of art and code, especially since this article only covers the basics of GA.
Full code repository with a working example: https://github.com/Oxyconit/painting_genetic_algo_ruby
Happy coding!